Christmas Stocking Tutorial and Pattern Featured On Craftaholics Anonymous® Today!

Christmas Stocking Tutorial

Can you believe Christmas is a week from today?? I know that’s crazy right?  I’ve had all of my decorations up since the day after Thanksgiving but my fireplace has been very lonely and without stockings for the past two years.  Yep, after Emma Grace was born I wanted to make cute stockings for our new family of four but…that didn’t happen.  Then last year it was so crazy it didn’t happen either.  So when I had the opportunity to come up with a fun sewing tutorial for  Craftaholics Anonymous® this month, I jumped on the idea to finally make our stockings.  So if you are looking for a fast and easy Christmas stocking head on over to  Craftaholics Anonymous® to download the pattern and check out the entire tutorial.  Stay tuned and later this week I will share how I made these cute little ornament frames to personalize each stocking too!

Christmas Stocking Tutorial | jRoxDesigns

Signature


2013 Craftaholics Anonymous Creative Team

I’m part of the 2013 Craftaholics Anonymous® Creative Team!  Stop by and meet all the fabulous ladies that will be bringing you all sorts of inspiration all year-long here!

Simple Laminated Bib Tutorial and Pattern

Toddler Laminated Bib by jRoxDesigns

Bib #2 is here today!  Did you enjoy the reversible bib pattern from last week?  Well you are in for a treat because it is time for another easy bib pattern and tutorial today.  This one is geared more for my snacking age babies and toddlers because trust me they need some love too!  What I love about the laminated bibs is they are so easy to wipe right off and are ready for the next meal.  They are truly a lifesaver because they not only keep all of those adorable clothes nice and clean but that means less laundry for you.  This makes them a perfect gift!

Free Infant Bib Pattern and Tutorial | jRoxDesignsDownload Infant Bib Pattern here.

Free Toddler Bib Pattern and Tutorial | jRoxDesigns

Download Toddler Bib Pattern here.

Supplies

18″x 11″ cut of Laminated or Oilcloth Fabric (You can make two bibs with a 18″x22″ Fat Quarter!)

2″ x 1.5″ Velcro

2 yards of .25″ wide Double Fold Bias Tape (or .5″ wide Double Wide Fold Bias Tape)

Coordinating All Purpose Thread for Top Stitching

Laminated Bib Tutorial | jRoxDesigns

After you have cut our your pocket bib pattern you will need to cut out your bib font and pocket from your fabric.  For this project I chose to use a laminated cotton because they are so easy to wipe right up after messy eaters!  You can also use this pattern with super soft cotton for a droller bib without the pocket if you would like too!  One of the only drawbacks of using laminated fabrics is they tend to crease easily.  So you will notice in the pattern that it indicates to place your pattern on a fold to cut.  Rather than folding my laminated cotton I trace the first side around all the sides except the fold line.  Instead of tracing the fold line I make to small vertical tick marks on the top and bottom of the center line and then flip the pattern over onto the back to complete the pattern.  Or if you would like you can print off two of each pattern and tape the pieces together to make full size pattern pieces of the front and pocket pieces!

Laminated Bib Tutorial | jRoxDesigns

With this pattern you can choose from any type of top closure that you would like.  You can make a Velcro closure, like I will show you here, or you can use a snap or even extend your bias tape at the ends to make a tie closure.  It’s up to you!  I love options!

If you are choosing a Velcro closure I would suggest cutting and gluing your Velcro first.  Then while you are working on the pocket it will give you time for the glue to dry.  Since you are only sewing around two out of the three sides of the Velcro I would highly suggest permanently adhearing the velcro to the fabric.  Velcro actually makes an adheasive glue specifically for their products that you can find at almost any local craft store.  Remember, you want to say away from using anything that requires heat for bonding because it can melt the laminate coating of your fabric.

Laminated Bib Tutorial | jRoxDesigns

When you are cutting your Velcro remember that one side will go on the top of the fabric while the other side goes on the bottom of the fabric.  How you would like to do it is again completely up to your preference.  I personally like to put the loop side on the top of the right side and the hooks on the bottom of the left side.  This means that when I close the bib the left side will be on the top.  Again feel free to do whichever you like best!  (I’m also a firm believer of “Use what you have!” so if you notice I actually only had thin long strips of Velcro on hand so I just cut two pieces and placed them side-by-side to create my closures!)

Laminated Bib Tutorial | jRoxDesigns

We will start off by sewing the pocket by placing the bias tape across the top flat edge of your pocket.  Leave a small amount at the starting edge of your pocket sew straight across with a long top stitich.  When you come to the end of your pocket don’t forget to back stitich and then trip any excess off of each end.  With laminate and oilcloth the fabric is a bit thicker and I have found over time that when I use pins to hold the tape in place it tends to bunch up the fabric so that it doesn’t sit flat.  Then one day after looking around on my desk it hit me….binder clips!  They clip your fabric right in place nice and tight, they don’t bunch up or leave holes behind.  They are quick to take on and quick to take off!

Laminated Bib Tutorial | jRoxDesigns

Just like regular pins make sure to slowly take them out one by one as you sew along.  One quick line of top stitching and your pocket is done!

Laminated Bib Tutorial | jRoxDesigns

So far so easy right?  Next line up your pocket with the main bib piece and clip in place.  I like to start and stop by bias tape on the bottom of the pocket.  If you would like to hide it in a better place start your bias tape on top of the loop side of your closure and then it will be covered when the bib is closed.  I like to do it on the bottom of the bib because it can get a bit tricky to start and stop around sharp corners.  If you take a couple extra minutes you can fold your tape over on top of itself without having to sew the ends together and it can still look really nice.

Laminated Bib Tutorial | jRoxDesigns

When you are top stitching make sure to reinforce the edge where the pocket meets the bib front by backstitching.  This will insure that it can stand up to lots of use over the years!  The trickiest part of this entire project is sewing around the inside of the neck because the curves are so tight.  I like a bib that is a bit snugger around the neck so that it saves any dribbles from going behind the bib and getting all over your little ones cute clothes.  Again just slow down and take your time and it will pay off.  When I make my bibs I usually do one stitch at a time and slowly turn in between each stitch to make sure I’m staying as close to the edge of the tape as possible.  If you don’t get it right the first time…it’s okay!  Just go back and try again!  You can do it!

Laminated Bib Tutorial | jRoxDesigns

Once you get to where you started the bias tape simply fold it over and make sure to backstitch!  Now you are DONE!  Yeah!!  Remember how I was saying that this pattern is great because you can customize it however you would like?  Well think about it.  You can do it

Without a Pocket

Simply add your Velcro and go straight to sewing on your bias tape!

Snap Button Closure

Forget about cutting those Velcro pieces and use the dot at the top of your pattern as a guide as to where to place your snap!

Double Sided

Print off the original patterns for this project and add in your preferred seam allowance around the outside of the entire main front piece.  Cut out two pieces of fabric one for the front and one for the back.  Place the two fronts together and begin sewing them together using the seam allowance you chose at the bottom center of your bib.  Sew all the way around your piece leaving a small hole to turn your fabric right side out.  Turn and press.  Topstitch around the entire bib.  Then choose your closure to finish it off!

Toddler Laminated Bib by jRoxDesigns

Don’t have time to sew?  Check out finished custom bibs in my Etsy shop here!

Signature


Reversible Baby Bib Tutorial and Pattern

Easy Reversible Bib Tutorial | jRoxDesigns
Tis the gift giving season and nothing makes for a more personal gift than something made from the heart!  So I’m here to help you out with a super easy reversible bib pattern and tutorial that you can whip up in no time at all.  It is perfect gift for any baby shower, holiday gift or a way to say congrats to a newly expecting couple!

Free Reversible Infant Bib Pattern and Tutorial | jRoxDesigns

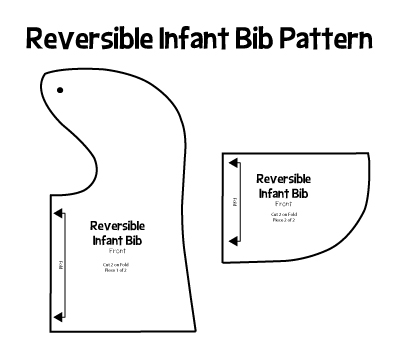
Download Infant Reversible Bib Pattern Here

Free Reversible Toddler Bib Pattern and Tutorial | jRoxDesigns

Download Toddler Reversible Bib Pattern Here

Supplies:

  • (2) 18″x 11″ cuts of your favorite fabrics
  • (1) Snap Fastener (For this tutorial I used a size 15 which is 3/8″ or 9mm)
  • All Purpose Thread
  • Coordinating All Purpose Thread for Top Stitching

Prep Your Pattern and Fabric

First things first, you will want to pick out the fabrics you would like to use for this project.  When I sew infant bibs I tend to use a fun print on the front and then either an absorbent terry cloth or a super soft minky on the reverse side.  For my toddler bibs they aren’t usually as messy so I can get away with doubling up the fun with prints on both sides!  It is all up to you!

After you have downloaded the the pattern of your choice be sure to cut each piece out and tape together where it is noted on the pattern.  Then trace out your bib pattern onto your fabric and cut it out.  Place your face (front) sides together so the backside of your fabrics are what you see on the outside.  Because we are working on what is going to be the inside of the bib we need to leave a gap where we can turn the fabrics right side out.  I usually like to find the straightest stretch of my fabric staying far away from any curves and start there.  By having the opening on a straight edge it makes it is less noticeable when you top stitch the opening closed and makes a smoother seam.

Reversible Bib Tutorial by jRoxDesigns for Craftaholics Anonymous2

The pattern we are using has a 1/2″ seam allowance.  I have always hated trying to follow the measuring guides on my sewing machine so I actually adjust my  needle left so that the space between the needle and the edge of my presser foot is 1/2″ which is my seam allowance!  This will not work for everyone since not all sewing machines have a feature where you can slightly adjust your needle position but if yours does it is very helpful! 

Reversible Bib Tutorial by jRoxDesigns for Craftaholics Anonymous3

Sew Your Seam

Once you shave sewn almost all the way around stop before you get to your starting point and make sure to backstitch.  For this pattern you can give yourself a 1-2″ gap.  This gap is where you will turn your fabric right side out.

Reversible Bib Tutorial by jRoxDesigns for Craftaholics Anonymous4

Trim and Clip Seam Allowance

Before you turn your fabric you will want to remove some of the excess bulk from around your seams.  By doing this your seams will be smooth and lay flat once you have turned your bib right side out.

If you have inner curves, like the neckline in this case, they should be cliped into the seam allowance at even intervals ending about 1/8″ from the stitching.  If your curve is shallow you can clip farther apart while if your curve is deeper you should make your clips closer together.

On this pattern we also have outer curves (mainly the bottom edges) that also need to be clipped.  To clip outer curved seams you will need to cut small “v” like shapes.  Again just like your inner curves they should end about 1/8″  from the stitching and should be clipped farther apart for shallow curves and closer together for deeper curves.

Reversible Bib Tutorial by jRoxDesigns for Craftaholics Anonymous6

Turn Bib Right Side Out

Now its time to turn your bib right side out!  Remember that little gap at the bottom you left?  You want to reach inside and pinch one of the layers of fabric and pull it out through your opening.

Reversible Bib Tutorial by jRoxDesigns for Craftaholics Anonymous7

Don’t forget while you are pulling everything right side out that you can also reach in and push against your seams to get help them to lay flat.  Now your bib should be all closed up except for the one small opening.  Looking good so far right?

Reversible Bib Tutorial by jRoxDesigns for Craftaholics Anonymous8

Iron

Now grab your iron to press out your seams.  I like to start in the middle of the bib and slowly push my way out toward the edges.  This will push the seams out so they are nice and flat.

Reversible Bib Tutorial by jRoxDesigns for Craftaholics Anonymous9

Topstitch

Once your bib is pressed its time to topstitch!  A topstitch is a stitch that is sewn parallel to the edge of your fabric.  Depending on your project a topstitch can either be decorative or functional.  In our case it is actually both.  We are functionally closing off the opening at the bottom we used to turn the bib right side out as well as stitching over top of our seam allowance so that the seams don’t “sink” back in when the bib is washed.  Our topstitch is also decorative because it gives your bib a nice polished look!

Set your machine stitch length to a slightly longer length than normal and try to find a nice coordinating color thread to blend in with your fabric.  I actually like to sew with a length slightly less than your longest length setting on your machine.  By doing this I’ve found you have more control over your fabric because the longer your stitch length the more the fabric has to move forward with each stitch.  Because the fabric moves very quickly while you sew it can tend to “jump” if your presser foot does not have the proper tension.  A stitch length that is too long can also make it hard to have smooth stitching around sharp corners.  Try practicing with different stitch lengths on a scrap piece of fabric before you topstitch to see what length you like the best!

Reversible Bib Tutorial by jRoxDesigns for Craftaholics Anonymous10

Apply A Snap Closure

Now all you have to do is apply a quick snap and you are done!  I used a standard size 15 snap fastner which is 3/8″ or 9mm for this bib but you can use whatever size you like best.  I bought a kit at my local fabric store that came with a easy attacher tool and two different sizes of snaps for about $6.  No matter what type of snap you end up deciding to use just make sure to read and follow the directions that are included.

Reversible Bib Tutorial by jRoxDesigns for Craftaholics Anonymous11

With the tool that I have all you have do do is push the prong side of the snap through the fabric,then turn the fabric over and place the snap side overtop of the prongs that is sticking through the fabric.  After you have them in the proper position place them inside of the easy attacher tool, close the top to secure the snap and hammer the top of the tool.  Hammering will crimp the two pieces together to secure them.  I love this style of snap because they are quick, easy and don’t require any extra sewing.  There is a little bit of a learning curve to make sure you get everything aligned right so don’t get frustrated if you don’t get it right the first time.  Again make sure to refer to the directions included with the snaps you purchase!

Reversible Bib Tutorial by jRoxDesigns for Craftaholics Anonymous12

Once you finish the first side of the snap repeat the process for the second side.

Reversible Bib Tutorial by jRoxDesigns for Craftaholics Anonymous13

Then give them a good ‘ol snap to make sure they work okay.

Reversible Bib Tutorial by jRoxDesigns for Craftaholics Anonymous14

And your done!!!  If you are new to sewing I know that this is a lot to take in but slow down and take your time.  You will be surprised to see that after you finish your first one the second one should be a breeze.  I’ve had so many babies to give gifts for lately that I can whip these bibs out in no time!  If you run into trouble or have any questions just feel free to leave a comment and I’m here to help!  Be sure to share photos of your finished bibs with us too, we want to see your all your hard work!

Don’t have time to sew?  Check out finished custom bibs in my Etsy shop here!

Signature


Finding Joy In Life

First off can I say how much I have missed checking in with you guys on a regular basis?  Life has been crazy around over the last couple months.  Well, actually who am I kidding I mean the last YEAR!!  We have slowly learned how to rearrange our lives to accommodate an active 4th grader with a busier social life than either of his parents combined.  Then there is a toddler who doesn’t sit still and always has us on the go.  I’ve been working hard helping out my hubby with his 2nd business/hobby/adventure all while he still plugs away at his regular full-time job.  There have been tons of DIY projects between our home and helping friends and family with projects of their own as well.  It seemed for a long time we were so busy with “life” we couldn’t find the time to actually “live” our life together as a family.  With all the craziness hubby and I had to sit down and decide what was really important to us.  I LOVE spending time here with you guys and we both love our DIY projects but we had to reassess where we were spending our time and how we were spending it.  Over the last year or so we had slowly found ourselves partaking in projects that even though we loved them, they  weren’t necessarily what was best for our family.

Christmas Twinkle Light Photography by Amber Foster Smith Photography

So after a lot of consideration I took a step back from DIY blogging for a little while to purse my real passion in life, photography.  It’s funny how photography even plays such a large roll in our family’s daily life.  Most of the time it is capturing those sweet candid shots of our day-to-day lives but it is also plays a big roll here on the blog as well as my Etsy shop.  My kids though…wow they are my tiny, little budding photographers.  It brings a smile to my face when Jake begs me to bring along his DSLR and wants to pick my brain on “what the best settings are” for this or that.  Emma Grace on the other hand has two toddler safe play cameras but insists on sneaking my vintage cameras off my bookshelves and asking me to “cheeeezzzeeee” for her!  They have always been so patient with Mommy wanting to get just “one more shot” or “trying something different” and for that I have been rewarded with TONS of priceless photos of my precious little ones.

Photography brings so much joy to myself and our family so it only came naturally that I wanted to share that joy with others and thus launched  Amber Foster Smith Photography. Ever since I have been blessed to be able to share in so many families’ special moments.  I’ve been there to capture the first days in several sweet newborns lives!

Newborn Photography by Amber Foster Smith Photography

This cutie’s session was full of so many sweet moments you can see them all right here.

Then this little girl I not only got to visit right after she was born…

but last week we got to play again with the help of a bit of magical Christmas twinkle!

I spent a fun afternoon with this stylish couple walking the streets of downtown Raleigh!

Before all of those sweet newborns though there are beautiful and strong mommas who deserve to be pampered too!   How gorgeous is this pregnant momma??  You should see her handsome baby boy!

Then there was this little guy!  I called in a little favor and his momma and I surprised this future pilot with a big gift for his second birthday…being able to crawl around in a couple REAL airplanes and even a tour of a private hangar from one amazing pilot! The joy in his face is why I love sharing my gift with others!

So there you have it, this is why I have been MIA over the last couple months.  Don’t worry I still love you and I  will still be back sharing lots of fun projects with you right here!  Christmas time in our house is always filled with lots of DIY gifts for not only the kids but the family as well, so I’ll be sure to share those with you as finish them.  If you stay tuned I even have two easy peasy bib patterns and tutorials lined up for the next week.  Rumor is that a sneaky little elf will be here any day now too.  If you follow me on Instagram ( You don’t?  Well you should..I’m kind of fun!) you would know that I’ve been working away on a big gift for a little girl who will make its début here soon too!  So, thank you for hanging around because you all mean the world to me!  If you have a minute it would mean so much to me if you would stop by and checkout my site.  Or maybe you want to see our latest happenings or catch all the latest session sneak peeks head on over to my Facebook page!  I can’t wait to share with you all of my latest adventures both here and there!

Signature